Open | Import | Drag'n'Mill
 © send2cnc.com
A very useful and efficient feature of send2cnc is the intuitive handling when loading files.
Depending on how a file is loaded, the system adapts to the current conditions.
Here is a list of the different file groups that are distinguished when opening:
- Project file (*.s2c)
- Template file (*.s2ct)
- import formats (graphics, 3D models)
- license file
There are several ways to load these files:
- As arguments when starting the program (e.g. double-clicking on a project file)
- via the open menu in the program interface
- via the open menu in the program interface (with an open project)
- via drag and drop on the start screen
- via drag and drop on an open project
Files are loaded as follows:
- [A] As an existing project
- [B] As a new project
- [C] Imported into an existing project
- [D] Drag'n'Mill
- [E] Query via pop-up menu
- [F] No effect, command is ignored
In addition, a distinction is made as to whether a single file or different file types are to be processed together.
This results in the following behavior:
| Behavior | *.s2c | *.stct | import files | *.s2c + import files | *.s2ct + import files | |
|---|---|---|---|---|---|---|
| Program start | [A] | [B] | [B] | [A] and [B] | [B] and [B] | |
| Open | [A] | [A] | [B] | [D] | [D] | |
| Open in project | [A] | [A] | [E] | [D] | [D] | [D] |
| Drag'n'Drop | [A] | [B] | [B] | [D] | [D] | |
| Drag'n'Drop on project | [A] | [B] | [B] | [D] | [D] |
Drag'n'Mill
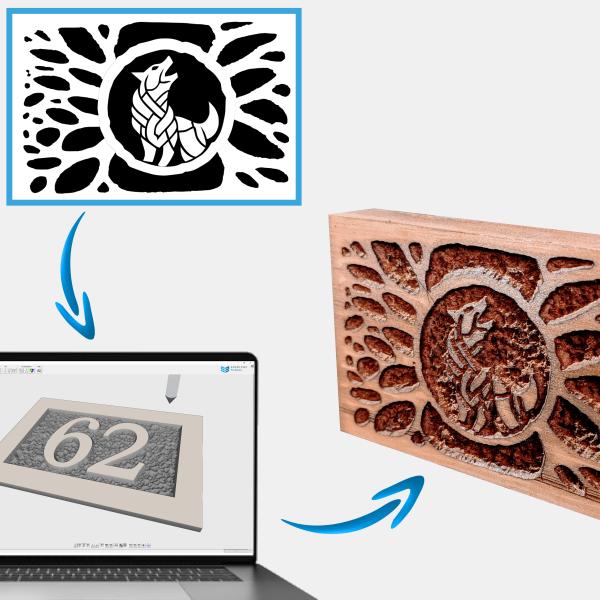
This feature is not named without reason. send2cnc enables the creation of executable NC programs by simply dragging and dropping new importable files via Drag'n'Mill.
Which and how many files are required for this depends on the template used or the reference project. For a simple engraving template, only a single graphic is usually required.
 © send2cnc.com
Reference project
The reference project is a project that is already open or a project file that is opened together with the import files.
Import files
All file formats that can be imported.
How it works
To ensure that the templates and reference projects can be prepared appropriately to guarantee a fully automatic process, it is important to understand how Drag'n'Mill works.
The individual steps are described here, along with what this module does in the background.
To keep this section clear, 3D models are not described here. However, the functionality is the same as for heightmap models.
Step 1 - Create a copy of the reference project
The reference project is created as a new project or copied.
Step 2 - Exchange geometry
The program searches for objects that were created from imported graphics. These are usually heightmap models and workpieces with the "Image" geometry mode.
The first image is integrated into the first model found, the second Image into the second model found, and so on.
Heightmap models that were created with a different geometry mode are skipped.
Step 3 – Building the 3D geometry
The model's 3D geometry is built from the exchanged image. All modifications defined in the object are applied.
Step 4 – Updating reference objects
If other objects reference an object that has been modified in steps 1 and 2, these will now be adjusted and updated. For example, a blank can adopt the new dimensions and a workpiece origin positioning can adopt a new position through snap points.
Step 5 – Save project under a new name
Now the project is saved. The directory and name are taken from the first imported file.
Step 6 - Calculate the toolpaths
In this step, all job objects contained in the project are calculated. If something goes wrong, the previously saved project can be opened and checked for discrepancies.
Step 7 – Postprocessor
send2cnc stores the last postprocessor used with the project. So if the reference project has saved a pre-selected postprocessor, this is now used and the final NC program is generated. Multiple selection also makes it possible to generate an NC report and an NC program at the same time.
Step 8 – Save
After everything has been calculated and transferred to the postprocessor, the project is saved again.
Project preparation for Drag'n'Mill
The following guidelines are recommended for a project or project template used by Drag'n'Mill:
- At least one model that was created by an import file.
- These models can be sized by modifiers.
- All other models should have a reference to these models.
- The size of the raw parts should refer to these models (geometry mode "Reshaping – Box").
- The workpiece origins used should be directly or indirectly linked to these models via raw parts.
- The project should have one or more pre-selected postprocessors in the postprocessor dialog.
Possibilities
It is well worth mastering this module. Once you have prepared a handful of projects for your own conditions, simple engravings up to complex 3D machining can be realized at the push of a button - in a matter of seconds.